Feeling creative? The best craft Ideas (for grown-ups)
If you're in the mood to create and crafts but not sure where to start, we've got you covered.

It's a wonderful feeling when the urge to create strikes . . . but, what to create can often feel like the tricky part. If you're looking for creative craft ideas for adults, from creating homemade flower-pressed candles to painting your own abstract art work, these mindful activities and crafty ideas are sure to inspire you.
Easy abstract paintings

The following two painting exercises appear in Start Painting Now, a practical, accessible guide to discovering your creative spirit, giving you brilliant new tools for relaxation and self-care, from Instagram's favourite artist Emily Powell and her sister, doctor Sarah Moore,
In Emily and Sarah's own words: 'This is an exercise our dad taught us and it's called 'taking a paintbrush for a walk'. This task is purely intuitive and we want you to concentrate on mark-making and colour. It sounds simple but it can become completely absorbing.'
What you will need
- A paintbrush
- Paints in an assortment of colours
- One large piece of paper
- Water (for paints)
Method:
- Take a piece of paper – the bigger the better as it gives you more room for expressing yourself.
- Gather together paint colours you love.
- Pick a colour an load your brush with paint and a bit of water to make it last.
- Drag your brush around the page in one fluid motion – in and out, up and down, zig-zag and curly, crossing back and forth.
- Now it's time for the really absorbing bit – you'll have made all sorts of shapes on the page and then colour them in. use colours you love seeing together, experiment with new combinations, feel your way through the piece
Turning everyday objects into art

This task is all about celebrating the mundane and the everyday, getting to know the objects around you and beginning to experiment with composition. This is a great one to revisit regularly and you can pick bits to use as a fun warm-up exercise if you're not sure what to paint.
What you will need
- An everyday object of your choice (to paint!)
- A paintbrush
- Paints in an assortment of colours
- Pens and pencils in assorted colours
- A stack of paper
- One large piece of paper
- Water (for paints)
Method:
- Take one everyday object you love, such as a teapot, a plat, or even a cat!
- Get a stack of paper, along with a pencil/pen/paintbrush or even a few different materials in similar colours.
- Now it's time to draw and paint your object in many different ways – here are some examples that you might want to try to get you going:
- Paint it in two minutes – set a timer!
- Paint it with your eyes closed – no peeking!
- Draw it as one continuous line – no lifting your pen!
- Paint it just with shading – no lines allowed!
- Draw it upside down – try doing that one without sticking your tongue out in concentration!
- Paint a big piece of paper in a contrasting colour
- Now cut out all your paintings and arrange them on the paper to make a still life celebrating your object.
Repeat with other objectsand build a whole set of images that you can mix up and rearrange to make still life compositions. Once you've stuck them down, paint in and around the objects. Fill in a background, add in details, make it a story – do whatever you feel is right. Share your reality!
Start Painting Now
by Emily Powell

This playful and practical handbook will connect you to the artist within, and foster your creativity. Instagram star artist Emily Powell and her sister, doctor Sarah Moore, are your guides to ignoring the inner critic and finding relaxation and meaning through painting. Start Painting Now comes with examples of Emily and Sarah’s work, as well as inspiration from a range of women artists.
How to make pressed flower candles

These next three craft ideas appear in Laura Brand's The Joy Journal For Grown-ups, a beautiful, creative and inspiring book full of fifty imaginative ideas for crafts that encourage a sense of joy and mindfulness.
This simple method for creating your own pressed flower candles at home is the perfect easy craft idea for beginners and experienced crafters alike. Elegant and easy to make, you can apply this method to tapered candles or pillar candles as well as electric candles made from real wax. They add life to a table setting or celebration, and you can simply wrap one up in a little baking parchment to give to a loved one.
What you will need
- Makes 1 pillar candle
- Lighter/matches
- A cream pillar candle (and another candle for heating the knife)
- Small hand towel
- Selection of pressed flowers (choose the flattest ones for this, see page 166)
- Baking parchment
- A butter knife
- Kraft label
Method:
- Light a candle and keep it to the side; this will be used to heat your butter knife shortly.
- Use the hand towel like a pillow to secure your candle so it doesn’t roll around and you can have both hands free.
- Place your pressed flowers onto the pillar candle decoratively and then put the baking parchment over the top.
- Carefully hold your knife over the flame of the other candle and leave it for about 30 seconds (be careful of fingers!).
- Then bring it over to the parchment and touch gently down over the pressed flowers with the hot part of the knife. Try not to go too much beyond the flower onto the candle as all the wax around it will melt too. Using a knife gives you more precision, but the tip of an iron also works.
- Peel the parchment off, turn the candle and work your way around with your pattern of flowers. The pressed flowers will have been held in place by the melted wax.
- You might like to wrap the candle in a little parchment and seal with a Kraft label to gift it to a friend.
Note: As with all candles, please do not leave unattended once lit.
How to make salt-dough tags

Salt dough is not just for kids or Christmas – it is satisfying to make, it feels nostalgic and is a traditional craft that has been around since Ancient Egyptian times! It is made with just three ingredients: flour, water and salt, which acts as a preservative. Salt dough became a trend in the seventies when people made salt-dough figurines and wreaths that would sometimes be coloured and glazed to hang up in the home or, as was made popular in Germany, created as a celebratory offering and tree ornaments at Christmas.
You can use these as gift tags, name places on napkin rings and ornaments to hang on Christmas trees or for seasonal celebrations!
What you will need
Makes 15 small tags
- 1 cup plain flour, plus more for dusting your work surface
- ¼ cup fine salt
- Mixing bowl
- ¼ cup warm water
- Knife or shaped cookie cutters
- Baking tray Paper straw
- Twine or string
- Optional: Watercolour paints, fine-liner pens, craft varnish (I like Mod-podge)
Method
- Heat your oven to its lowest setting (around 140°C/120°C Fan/gas mark 1), then measure out your ingredients. Put the flour and salt into a mixing bowl, slowly pour in the warm water and combine.
- Once your doughy ball is forming, take it out and pop it onto a very lightly floured surface and knead like you would if making bread.
- Roll out the dough, not too thinly, and using your knife, cut out small rectangle tag shapes, or use the cookie cutter to press out your shapes.
- Lay all your shapes out on the baking tray and punch a hole in each one using a straw where you would like to thread it onto twine or string. Be sure not to punch your hole too close the edge, otherwise it might break. Pop the baking tray into the heated oven for around 3 hours. Set an alarm and check them at 45-minute intervals, turning them over so they dry on both sides.
- Once they are dry you can thread the string through the holes. You could use watercolour paints or a fine-liner pen to decorate, or you could coat them in a water-based, craft varnish like Mod-podge.
How to press your own flowers

Delicate pressed flowers can be used in many crafts, from homemade cards to candles and even in baking (as you will find later in this book), but they also capture a seasonal moment in nature – one that you can savour and reflect back on weeks, months, or sometimes even years later.
Although flower presses are readily available to buy in most gift or craft shops, and can even be made easily for those with some DIY skills, I wanted to enter into this chapter with a little easy prompt to show you how to get creative using books that you already have around the home.
Some flowers are more easily pressed using a flower press thanks to the weight or tightening of screws, so, as we will be using the weight of books to press flowers.
What you'll need:
- The flowers you'd like to press (Laura recommends daisies, pansies, honeysuckle, clovers, poppies, cornflowers, buttercups and narcissus for best results).
- Either two pieces of kitchen roll or two pieces of baking parchment.
- Your heaviest hardback book and a couple of extra books too.
Method:
- Go right to the back pages of the heavy book and put one piece of parchment down, then lay your flowers on top, spread out with space between them.
- Place the other piece of parchment on top of the flowers. You can now close your book.
- Put some other books on top and either remind yourself with a little ‘note to self ’ or put the books somewhere memorable to avoid forgotten flowers . . . although that in itself always provides a charming surprise for the reader!
- Your flowers will be pressed to perfection in 3–4 weeks.
The Joy Journal for Grown-ups
by Laura Brand

The Joy Journal for Grown-ups invites you to experiment, play and unlock your creative potential with a range of simple crafts that can bring a little more calm into your everyday life. Using store-cupboard ingredients and easily foraged supplies, this beautifully illustrated handbook includes new and inspiring ideas for adding a personal touch to celebrations, creating unique gifts, and making stunning keepsakes. Imaginative, engaging and easy to follow, this gorgeous, step-by-step guide features all the encouragement you need to find inspiration, awaken your creativity and brighten your mood.
If you love this, you might also like The Joy Journal for Magical Everyday Play, Laura's book of every day craft and playtime ideas that kids will love.
How to make floral ice cubes
Flowery ice cubes are simple and inexpensive to make, but they instantly add pizazz to any party. You can buy edible flowers readily these days, but you can probably find some for yourself growing in the garden or on a windowsill. Make sure the flowers you use are definitely edible before you begin and that they haven’t been sprayed with any chemicals.
To keep the ice cubes clear and cloud-free you need to work in layers because this cuts out the air bubbles and impurities, which is what causes cloudiness.
To keep the ice cubes clear and cloud-free you need to work in layers because this cuts out the air bubbles and impurities, which is what causes cloudiness.
The following garden flowers are all safe to use:
- Alpine pinks (Dianthus alpinus)
- Chrysanthemum (Chrysanthemum)
- Daisy (Bellis perennis)
- Elderflower (Sambucus nigra)
- Hibiscus (Hibiscus rosa-sinensis)
- Hollyhock (Alcea rosea)
- English lavender (Lavandula augustifolia)
- Nasturtium (Tropaeolum majus)
- Marigold (Calendula officinalis)
- Primrose (Primula vulgaris)
- Rose (Rosa)
- Sunflower (Helianthus annuus)
- Sweet violet (Viola odorata)
What you'll need:
- Large ice-cube tray – preferably silicone for easy access
- Distilled water (water that has been boiled and then cooled)
- Edible flowers
Method:
- Fill the ice-cube tray a quarter of the way up with distilled water. Add the flowers face down and freeze.
- Add some more water to reach the half-way mark and freeze again.
- Fill to the top and freeze for the last time.
The Wild Journal
by Willow Crossley

Willow Crossley’s beautifully illustrated guide celebrates the potential of nature to mend, heal and transform our mood. Full of creative craft ideas, practical projects, simple habits, small seasonal changes and therapeutic reflections, the book can help counteract the unpredictability and chaos of everyday life.
Slow down and sketch
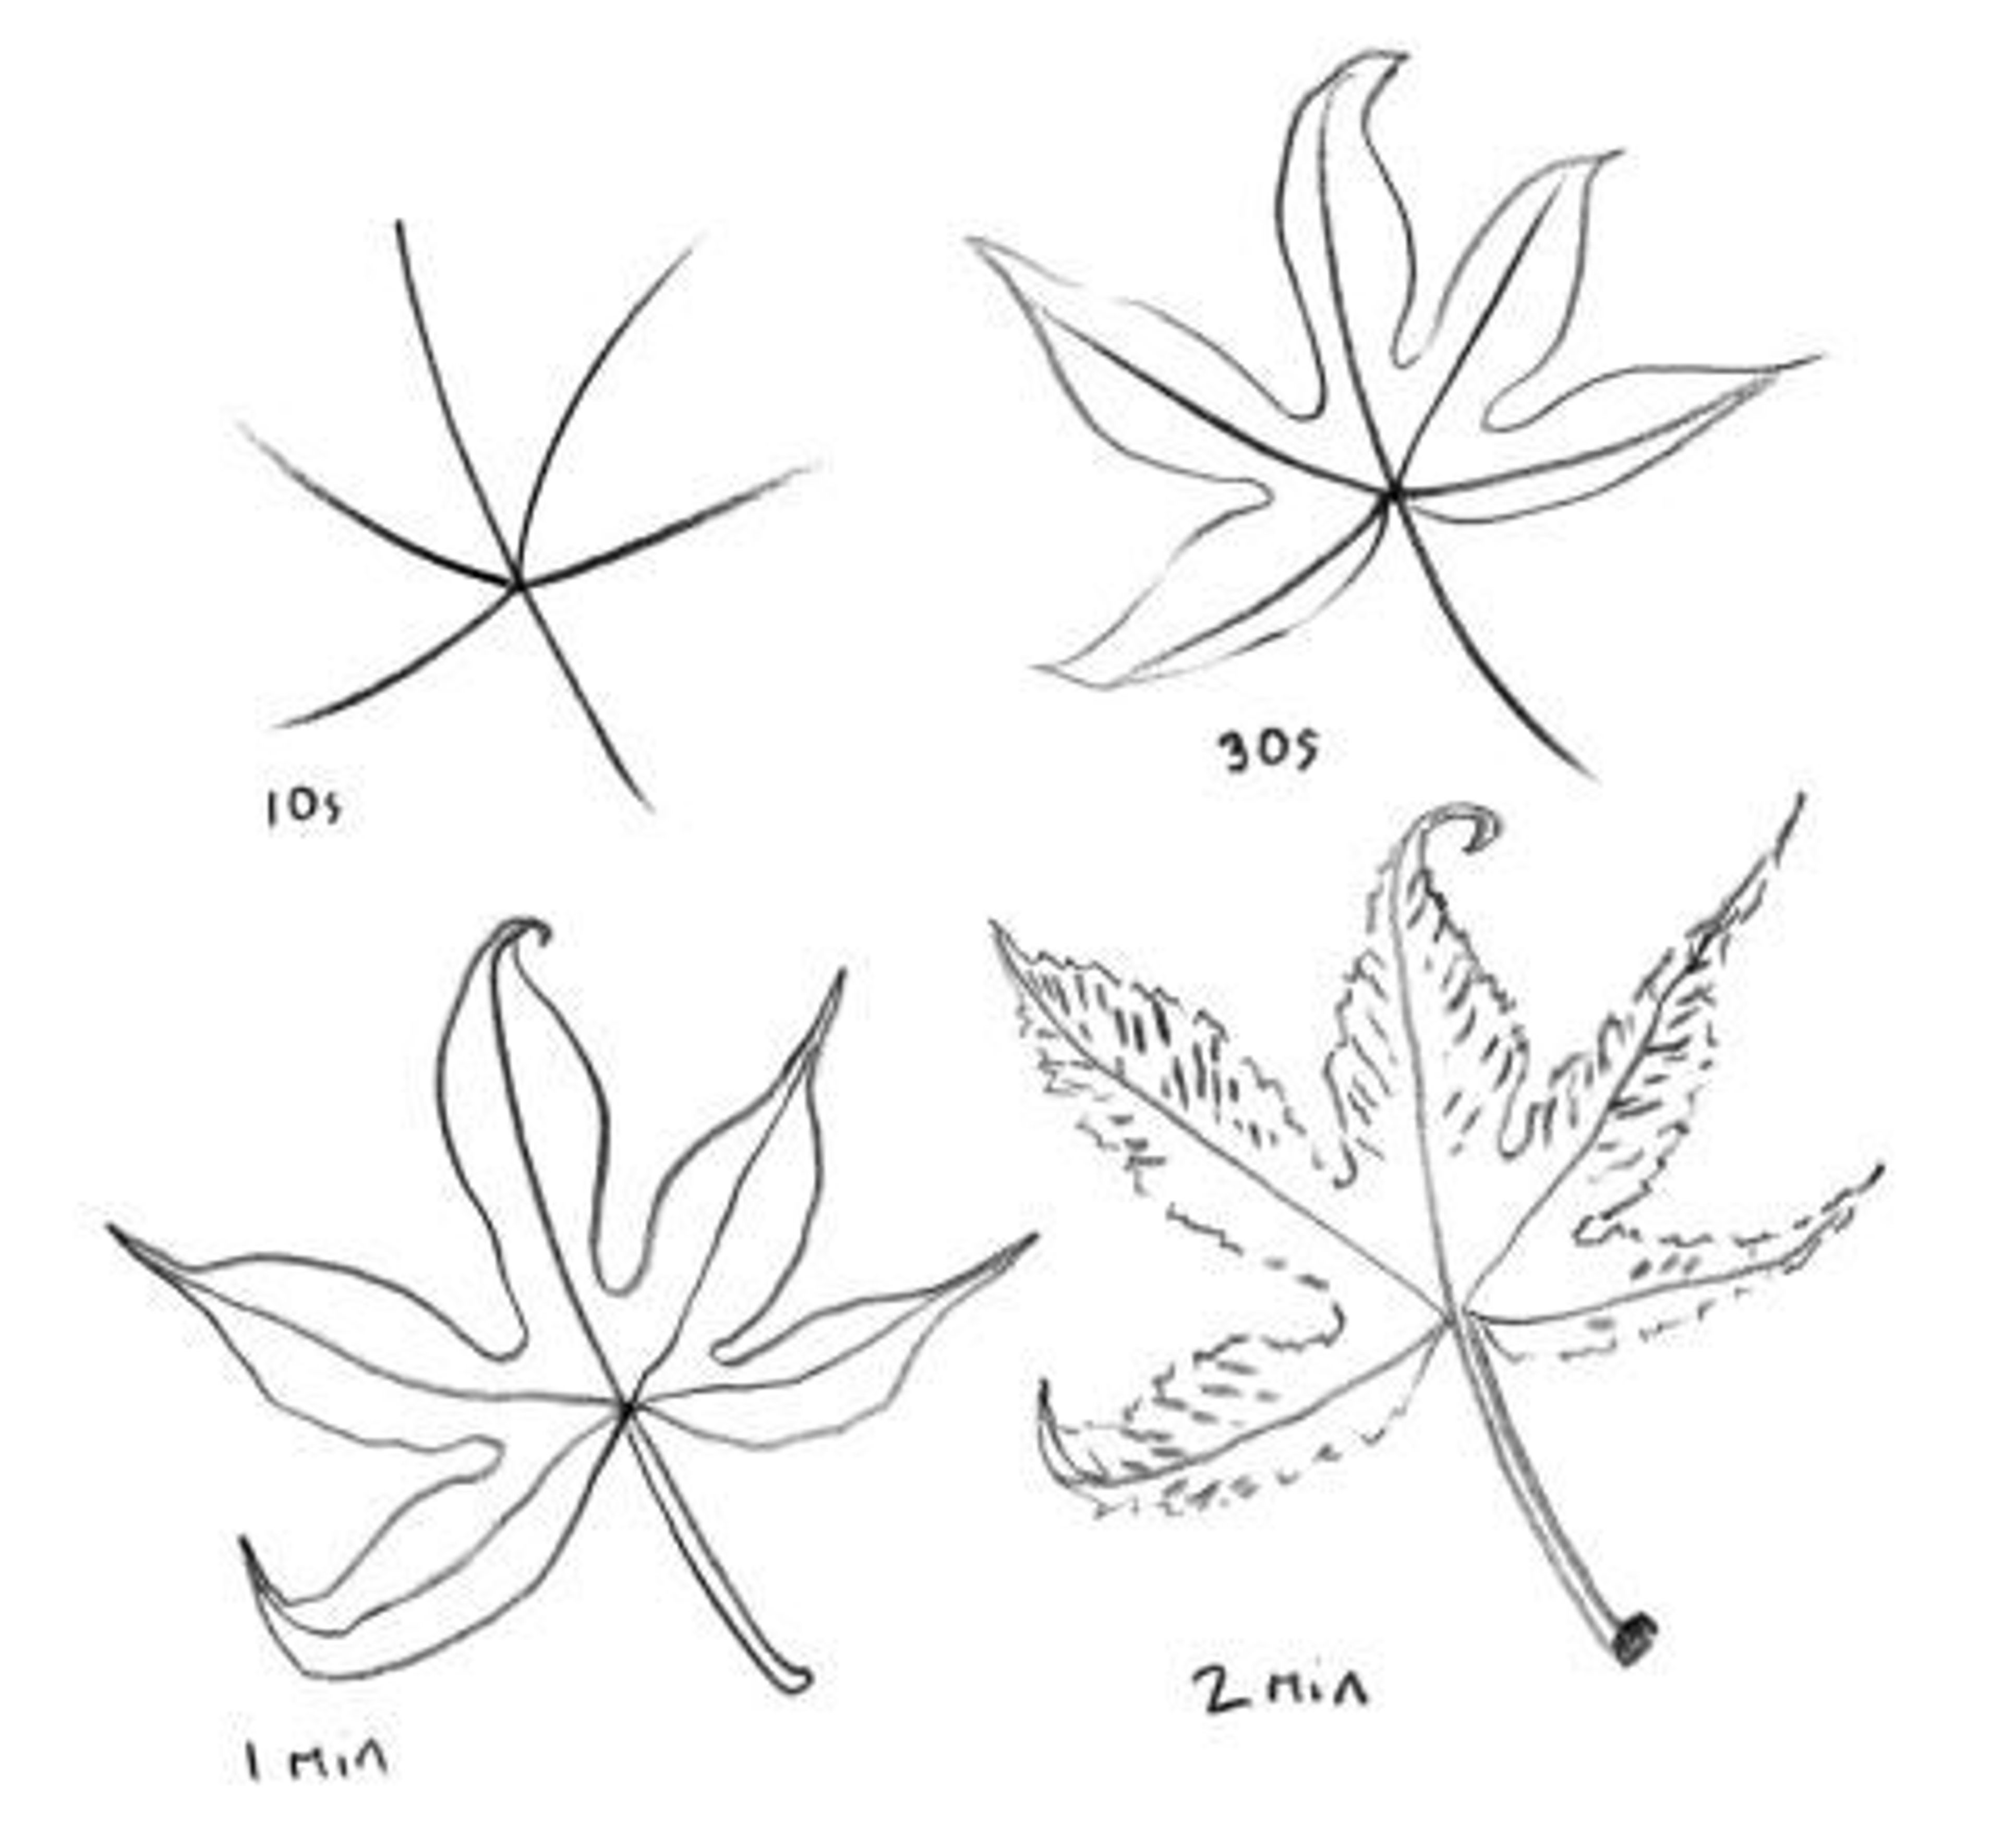
This final adult crafting idea appears in The Green Sketching Handbook by Dr Ali Foxon, a practical guide to sketching for pleasure, not perfection.
In Ali's own words:
'Although sweeping views, winter trees and tiny birds undoubtedly spark joy, I’d urge a little caution before you try sketching them. While there’s nothing stopping you from having a go, I suggest you start with much simpler subjects, and definitely avoid anything that moves. It’s important to build up your confidence, not destroy it by being overly ambitious and then feeling disappointed with yourself. When most of us say we ‘can’t draw’ what we really mean is we ‘can’t draw complicated things’. Yet.
The best way to keep it simple is to keep it small. Start by looking out for individual flowers, pebbles, shells or leaves to sketch, before you attempt whole plants. Or go even smaller, and look at individual petals, seeds or blades of grass. You might prefer to hone in on patterns and details – it doesn’t have to be an entire object. Follow the whispers of your curiosity and see what you find. As you grow in confidence, you can start sketching more complex objects if you want to. Or you can just continue sketching tiny finds – it’s entirely up to you.
Don’t worry if you initially struggle to find interesting things to sketch. As with everything else, it takes practice to start seeing little treasures. But once you start, it won’t be long before you’re noticing, and enjoying, an abundance of wonder and beauty most people never see.'
What you'll need:
- A timer
- Find something small and simple, but not too simple, that catches your eye – an interesting leaf, flower or sprig of berries, perhaps.
Method:
- Set your timer for ten seconds (yep, just ten seconds!) and sketch your object. It’s such a short time, you’ll only be to sketch the bare essentials of your object, perhaps the overall shape and not much else. Try it a few times. People who come to my workshops often find this laughably challenging, so it can also be a great way to relax and take your sketching efforts less seriously. There isn’t time to worry about whether or not you’re doing it ‘right’.
- Next, set the timer for thirty seconds and sketch your object again. Notice how much more you see.
- Sketch it again, but this time give yourself one minute.
- And finally, set the timer for two minutes and do one last sketch.
- Ask yourself:
- How did that feel? I bet two minutes felt like ages, didn’t it! It’s amazing how our perception of time can change when we’re absorbed in sketching.
- Which sketch did you prefer? Noticing how you feel during these exercises can give you clues about what sort of sketching style you’ll find most rewarding: quick and gestural or careful and considered?
- How did your observations change with time? How do you feel about your particular leaf or flower? By sketching it, you’ve changed your relationship with it. Maybe you appreciate it a little more?
- Do remember this exercise next time you try to convince yourself you’re too busy for green sketching. Two minutes is all you need!
The Green Sketching Handbook

Inspired by her own journey from climate scientist who hadn't tried drawing since childhood to artist and nature lover, Dr Ali Foxon will show you how to embrace your wobbly lines, unhook from a fear of criticism and create a habit that makes you feel good, not inadequate. You will learn more about yourself and your unique relationship with nature, finding out what brings you comfort and joy. Best of all, you'll create vivid and evocative memories of all your outdoor adventures, big and small, even if you’re convinced you can’t draw.
If you love craft ideas and are looking for a little inspiration to get your creativity flowing, or mindfulness activities to help you connect to the present moment, you may also like:
The Little Book of Calm Colouring
by David Sinden

Soothe stresses away and lose yourself in some creative colouring with this beautifully hand-illustrated colouring book full of stunning anti-stress designs and inspiring quotations.
The Mindfulness Moments Colouring Book
by Emma Farrarons

The Mindfulness Moments Colouring Book is the third book from international bestselling illustrator Emma Farrarons. Perfectly sized to carry around in your pocket or bag, this gorgeous adult colouring book includes ideas for mindfulness activities, all beautifully embellished with exquisite scenes and intricate, sophisticated patterns.


